Removing Our Master Bedroom Closet
Happy New Year, everyone! After being sick for literally 12 full days over Christmas, I went into the 2022 looking for a fresh start. My husband, Sam took off work for the first week of January and we decided to start tackling our first big project in our new “old” home.
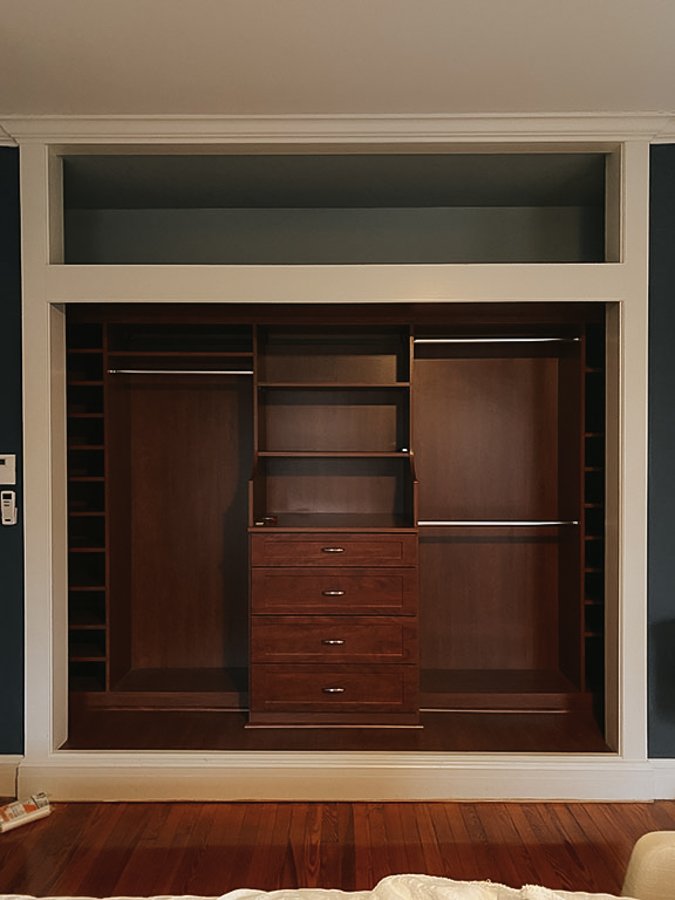
Our house is almost 120 years old and while there is still a lot of the original character present, there have been quite a few renovations to it over the years. Most of them we love, especially our kitchen, but our master closet was one renovation that left a lot to be desired. I was very confused as to how whoever designed this closet came up with the layout for it. The main closet was much wider than your double closet, the kind you might see with bifold doors. It had shelves behind the exterior walls that were extremely hard to access. I often found myself stepping up into the closet to reach anything on them. Additionally, there was a very large loft style shelf above the closet that was too high for us to access without a ladder so that was a bit impractical.
The closet itself was a very nice closet. I am sure whoever was living in our home at the time spent a lot of money to have it installed. It was made with nice materials and it had a ton of shelving and storage. I especially loved the middle set of drawers and the low hanging bar on the right side for pants. But because there were no doors, it made it a major dust collector. Every crevice and every shelf was completely exposed so dust would just settle everywhere so quickly. And because the closet consisted of that dark stained wood, you could really see the dust.
In the upper shelf/loft area the builder used underlayment instead of regular wood or mdf and if you’re familiar with the texture and nature of underlayment, it is not a surface you can simply wipe clean. It is bumpy, textured and anything but smooth to the tocuh. I got up on a ladder the first demo day and to take a look at it and I could not believe the amount of dust that had collected up there. It didn’t appear to have been cleaned in any recent years and probably because it’s nearly impossible to clean underlayment.
The other strange part of this closet layout was that there was another much smaller closet on the end of the main closet. We guessed this smaller closet was probably original to the house, but it was completely separate from the main closet. It was basically around the corner from the main closet and it was very awkward to access. It is kind of hard to explain, but maybe the photo below will reveal more of what it looked like. This closet was super small and was composed only of drawers and shelving. There was no hanging space in it and there wasn’t a lot of space between the closet and the wall beyond it, so opening the door to it was very tight. A large person wouldn’t be able to do it.
Lastly, the closet was basically on a stage. It was set up off the ground about 8-10 inches and it just accentuated the awkwardness of the closet. Having to step up onto it to access certain things didn’t feel natural.
Removing this whole closet “system” was not a question. I knew before we even put an offer on this house that if we were to purchase it, the closet would be the first thing to go. My husband and I decided it was definitely something we could do ourselves since we had a little experience with demoing our bathroom in our previous home. But to be honest, we were in way over our heads with this one. Like I said previously, our home is 120 years old so the materials and design are so different from our previous home which was builder’s grade and only about 12 years old. Just one football sized chunk of plaster weighs most of what a single 2x4 weighs. And we had about 10 dozen football sized chunks of plaster to remove.
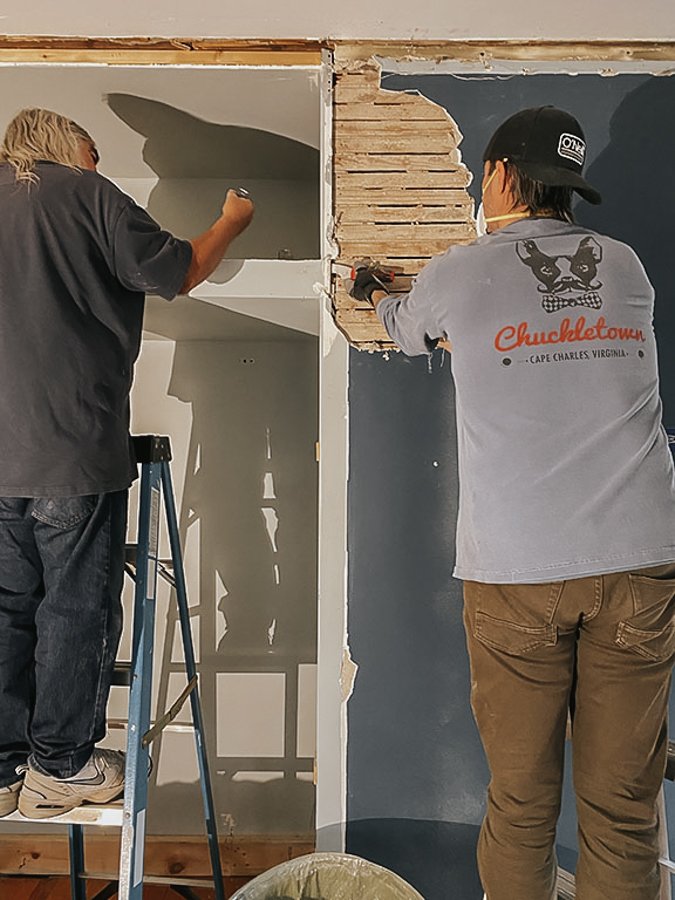
Luckily for me this was a project my husband took on mostly himself. Since we have two little ones I needed to be with our children and couldn’t do any hands on work with this project. However, my Stepdad came and helped in the process and we couldn’t be more grateful because it really sped things up. But even with the extra help it took 3 whole days to remove the closet system and the walls.
We started off by removing all of the crown moulding and baseboards around the closet. Since it was literally built into the walls, all of this needed to come up first. Then we were able to start dismantling the closet system which included the drawers, shelves, railings, and the frame of the closet as well. After that we could see start to see the drywall behind the closet which was added when the closet was renovated. You might imagine demoing a closet would include a sledgehammer resemble something you’d see on HGTV, but in reality it’s a lot of little pieces coming out one by one being unscrewed or pried up with a hammer and crow bar.
I was dying to see what was under the “stage” part of the closet. I could not for the life of me figure out why it was lifted up so high, but it turns out that underneath it was a simple frame made from 2x4’s. And once it was gone we could see some of the original flooring underneath. Whoever renovated the closet must have wanted to ensure that the baseboards ran around the front of the closet and that is why they built it up a bit. It also prevented them from having to repair the flooring as well. It all finally made sense.
This is where I discovered that our closet was actually built in place of two original closets. And you can see the evidence of that in the flooring. There are two separate flooring sections and where the flooring is missing is where the original walls were. One of the flooring sections served a smaller closet in the master bedroom. And the other was for a closet in the bedroom on the other side of our master bedroom. Both were very small closets so I totally understand why they decided to combine them to make one big closet.
Removing the frame underneath the loft/upper shelf area above the closet seemed to be the biggest pain in the demo process. It was built using a ton of brackets and was nailed into the studs with extra long nails. My husband and Stepdad ended up using a multitool to cut the nails so they could remove this. It was not coming down any other way. Except for maybe with a sledgehammer, but that seems a bit dramatic. Below is a photo before it was removed and a photo after it was removed.
At this point in the demo it was time to start removing the walls. This was probably the most exciting part for me because it made the biggest difference and I felt like I could actually see my vision for this room start to come to life. Because we did our research to determine that the walls weren’t load bearing, we felt confident in this part, but I won’t lie and say that we still had a few reservations in the back of our minds. We’ve never removed plaster walls or worked with lath and plaster at all. And because our house is so old and the walls we were were removing were original, we worried there may be some settling afterward, but so far, so good.
Removing the plaster was an absolute mess. I was smart to cover our furniture with plastic, but that didn’t stop the dust from getting all throughout our second floor. Plus like I said before, the plaster is extremely heavy so this part was not simple. You can see all of the lath and plaster on the other side of where the previously installed drywall was and you can obviously see where there was previously a closet door for the room on the other side of our master bedroom.
As I’ve said, this house is old. And by old I mean it was built when electricity wasn’t very common in homes. So it was interesting to us to see all of the exposed wiring in the walls. We have a lot of knob and tube wiring throughout this house and you can see in the photos below where it gets its name. There are porcelain knobs attached to the framing that the electric wires sit on and they keep the wires from touching the frame. What’s interesting is that when the closet was built, they put a 2x4 right up against some of the wiring. That seems pretty sketchy to me, so I’m relieved we are removing all of this. Including the knob and tube wiring. We have an electrician who will come and remove all of it from this area of the house and make it safe. He will also run new, updated wiring for this wall and install a two boxes in the wall for sconces as well.
What I didn’t expect and plan for with this project was how much more natural light I was going to get in this room once the closet was gone. I didn’t realize how much light it was blocking from the window near it. I think I just had tunnel vision with this closet and was really only paying attention to how much of an eyesore it was rather than what else was around it. I’m not sure I even knew there was a window there! But you can already see such a difference in lighting in the photos below.
The last step consisted of removing the frame of the walls which were actual 2x4’s, since I guess they used to legitimately measure 2 inches by 4 inches. Nowadays they only measure 1.5”x3.5” Once those were out I was on clean up duty, getting rid of all the dust and tiny chunks of plaster. During the demo process we were moving all of the debris into our garage and basement, but we were filling this place up quickly. So we rented a 14 cubic yard dumpster and spent another whole day filling it with everything we removed. We had no idea all of that could fill a dumpster that big, but it did.
Even though this project is only halfway done and we currently have nowhere to keep our clothes, I couldn’t be happier with how it’s coming along. The next step is to have our electrician come out and rewire everything. Then we will drywall the ceiling and walls ourselves. After that it’s figuring out how to weave the old hardwood flooring with new hardwood flooring so we can patch and repair the floors. There’s lots to come and it may be a lengthy process since we are only working on this on weekends from here on out, but check back soon for updates!
x Megan


